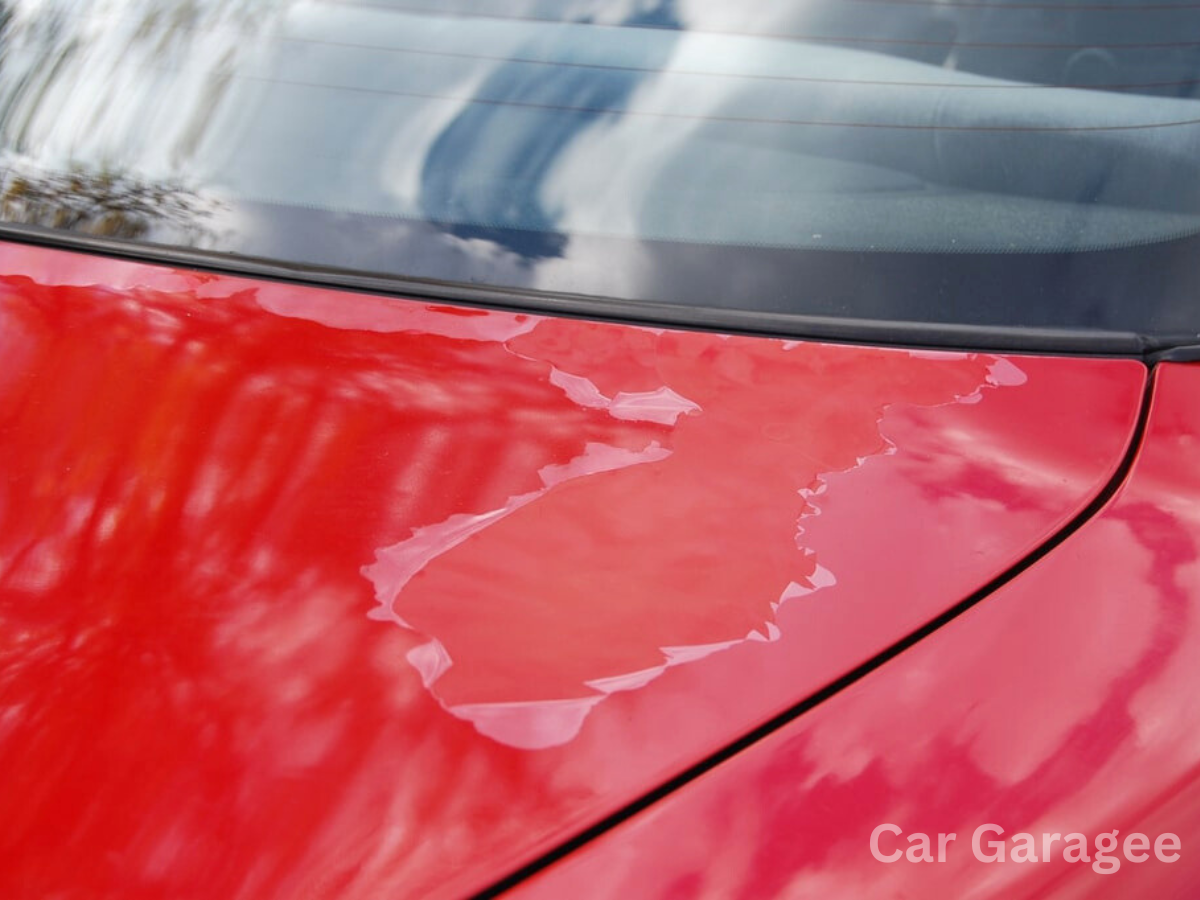
Removing clear coat from your car without damaging the underlying paint is an important skill every DIY car owner should master. The clear coat is a transparent layer that protects the paint from scratches, dust, and corrosion, giving your vehicle a glossy shine. Over time, this layer deteriorates due to exposure to the elements, which can cause it to peel, crack, or become blemished. To keep your vehicle looking its best, you’ll need to remove the damaged clear coat and restore the gloss. Following a step-by-step guide will ensure you don’t cause any permanent damage to the parts underneath.
Start the removal process by preparing your tools and setting aside a free afternoon for the task. If the clear coat is on plastic components like headlights or taillights, expect it to be flaking or yellowing. The first step in restoring these areas is to get rid of the old clear coat. This requires some detailing supplies and a lot of elbow grease, but with patience, you can achieve a like-new condition. The key is to take off the damaged layers carefully, ensuring the plastic and paint are left with a smooth, shiny finish. With proper technique and the right approach, your vehicle will regain its dazzling exterior in no time.
How to Remove Clear Coat From Car: What You Will Need

When removing clear coat from your vehicle without damaging the underlying paint, having the right tools and materials is key to working efficiently. Start by preparing your paint job with a thorough washing using a hose and water, followed by careful rinsing to remove any dirt before the actual removal process begins. You’ll need a specialized buffing compound, which is the safest way to tackle clear coat removal without causing harm to the exterior surface. A clear coat-removing agent can also come in handy for larger areas.
For sanding, have various grit levels of sandpaper ready—400 grit, 800 grit, 1000 grit, and 1200 grit will allow you to sand down the surface gradually, ensuring a smooth finish. Using a buffing pad—preferably 100% wool—will help with the buffing compound to remove the damaged clear coat and polish the surface. If you’re looking for long-lasting results and a mirror-image gloss, an electric polisher is a worthy investment. It’s much faster and less labor-intensive than manually polishing the car. A spray detailer and wax are the final touches, helping to bring out that shine and protect your newly treated paint.
The removal process can be laborious, especially if you’re aiming for a spotless and even finish. Using an electric polishing device will not only speed up the process but also give you the precision needed to achieve a smooth, shiny paint job. Remember to work in small sections and clean up after each step, ensuring that all harmful substances and debris are cleared off the surface. With the right tools, your vehicle will regain its original gloss and look brand new.
How to Remove Clear Coat From Car: The Step-by-Step Guide
Step 1: Prepare and Clean the Vehicle

Before starting to remove clear coat, the essential step is to wash your vehicle thoroughly. Use a hose to rinse off any dirt and debris, and make sure to soak the surface with soapy water. Be cautious during the process to avoid new scratches or dents. Scrubbing with a soft sponge and rinsing it off ensures there is no risk of leaving particles behind that could scratch the surface later. Wipe the car down with a soft cloth to remove excess moisture and allow it to dry in a well-ventilated area.
Step 2: Wet-Sanding the Surface
Once the car is clean and dry, begin wet-sanding using 400-grit sandpaper soaked in water. Start to gently rub the clear coat with a focus on problem areas and scratches, making sure to weaken the coat evenly. Be sure to cover about 1 inch around each scratch. This step is significant in softening the coat before moving on to finer sanding. Continue wet-sanding the entire car with finer grit sandpapers, including 800 grit, 1000 grit, and 1200 grit for a smooth finish. Make sure to work slowly and check your progress regularly by feeling the surface with your hand.
Step 3: Dry-Sanding for a Polished Surface
After wet-sanding, the dry-sanding process begins. Use 800-grit or 600-grit sandpaper and continue sanding at a 45-degree angle to match the natural grains of the surface, making sure to sand ½ inches beyond the previously sanded area. This step helps achieve the smoothness and even finish required for optimal outcomes. Remember to clean the surface to remove particles before moving forward.
Step 4: Buffing with an Electric Polisher
Now it’s time to buff the surface using an electric polisher at a lower rotational speed of around 1200-1400 revolutions per minute. Work in a circular motion with slight overlap to ensure the surface gets an even shine. If you don’t have an electric polisher, a 100% wool pad can be used manually, although this may involve more hard work. Remember to wear protective gloves to avoid burns, and polish sparingly for a controlled shine.
Step 5: Second Polishing with Buffing Compound

For a perfect finish, follow up with a second polishing using a clear coat-safe buffing compound. The buffing compound should be applied with a wool pad or specialized clear coat removing agent. Increase the polisher’s revolutions per minute to enhance the shine and remove any scratches. This step will ensure that any imperfections are gone. Be cautious while applying pressure to avoid burning the surface, and test the buffing compound on a spare part if unsure of its safety.
Step 6: Cleaning and Touching Up the Surface
Once buffing is complete, clean the surface thoroughly using a spray detailer. This will remove any residual chemicals, particles, and debris left behind. Wipe the surface down for a brighter, shinier appearance. Pay attention to delicate parts such as tail lights, headlights, mirrors, handles, and screen wipers—tape these areas off using blue painter’s tape to prevent scratches and ensure a neat finish.
Step 7: Addressing Stubborn Areas
For stubborn spots or heavily damaged areas, use a clay bar or plastic scraping tool to carefully lift the remaining clear coat without gouging the surface. This will help remove the toughest layers that sanding alone might not remove. Be sure to apply a light touch and work slowly to prevent any unnecessary damage to the underlying paint.
Step 8: Waxing and Final Touches
For the final touches, apply wax to the surface. Waxing is an exterior treatment that enhances the gloss and provides a protective layer. It adds evenness and prevents scratches and corrosion from affecting your car’s paint job. This step ensures long-lasting protection and is recommended for the perfectionist who wants their car to look its best.
Step 9: Inspecting and Polishing for Optimal Outcomes
Finally, inspect the entire polished area for any remaining imperfections. If you notice any scratches or swirls, apply a finishing polish with a softer polishing pad. Use a higher revolutions per minute on the polisher to achieve a stronger shine. When everything is done, your car’s paint should be smooth and glossy without any streaks or damage. Don’t forget to reapply the undercoat where needed, as it can be compromised during the removal process.
READ MORE:
What Is Drive Start Control Malfunction? Cause and Quick Solution
Where Is the Starter Located? 3 Easy Guides
How Much Does Sway Bar Replacement Cost? A Comprehensive Look
How to Remove Clear Coat from Plastic
Step 1: Clean the Plastic Surface

To remove clear coat from a plastic car part, such as headlights or other clear-coated plastic surfaces, start by thoroughly cleaning the area. Use soapy water and a sponge to wash away dirt and grit. Rinse off the soap suds, and wipe the surface dry with a towel or rag. Allow the part to air dry. Mask the edges and any surrounding surfaces, including surrounding metal, with blue painter’s tape to protect from accidental scratching.
Step 2: Wet-Sanding the Plastic Surface
Once the surface is clean and dry, begin wet-sanding the plastic part using 600-grit sandpaper. Spray the area with a soap-water solution made from liquid dish detergent and water in a spray bottle. Wrap the sandpaper around a sanding block and rub in all directions for about 5-10 minutes to remove clear coat. Focus on the edges and middle of the surface. Afterward, wipe off any sanding dust with a towel and rinse with plain water. The surface should appear uniformly foggy and dull.
Step 3: Final Sanding and Polishing
For a smoother finish, repeat the sanding process using 1000-grit sandpaper, rubbing back and forth across the plastic surface, keeping it wet and ensuring the sandpaper stays flat. This will help remove the last traces of the clear coat and begin smoothing the surface. After another 5-10 minutes, switch to 2000-grit sandpaper to continue smoothing the surface. After each round, wipe off the sanding dust. For the last sanding step, use 3000-grit sandpaper, spraying the surface with soapy water. Rub the surface in each direction to achieve a clear, shiny finish. After polishing, the plastic part—whether a headlight or another surface—should have a smooth finish and be see-through.
How To Fix Minor Clear Coat Damages

For less serious damages to your car’s exterior, you can easily repair the clear coat without needing full removal. Start by using a degreaser to clean the area and remove any wax. Then, tape off the section using painter’s tape, leaving about 1-inch beyond the damage. Use 800-grit sandpaper to sand the damaged spot, applying a lighter hand to create a smooth transition between the damaged and undamaged areas. Be careful not to create a lump or roughened line where the original clear coat ends. Once the surface is smooth, you’re ready to apply a spray-on clear coat.
Apply light coats of the spray-on clear coat, letting each coat dry before applying the next one. Continue until the surface is covered with multiple layers and looks even and smooth. This will restore the gloss and shine to the paint job. For car owners dealing with peeling or serious scratches, ensure any deep damage is corrected before applying a top coat to improve the overall condition of the car. By following these steps, your clear coat will blend seamlessly with the original clear coat for a professional finish.
FAQS
How do you remove clear coat from a car without damaging paint?
The safest way to remove clear coat from a car without damaging the paint is to use a specialized buffing compound or a clear coat-removing agent. This method ensures precision and control over the removal process. After using the buffing compound, applying wax is a requirement to protect the newly exposed surface and maintain the exterior treatment. While waxing can be a laborious process, using electric tools can make it more efficient and provide a smoother finish.
Can you fix clear coat coming off car?
When the clear coat on a car starts peeling, it can’t be fully restored without professional help. You may need to visit an auto body shop to have them strip the old coat and repaint the affected areas. If the damage has been neglected for too long, the entire car might need to be repainted to ensure the color and finish match throughout.
Will rubbing alcohol remove clear coat from car?
Using rubbing alcohol in small amounts won’t damage the clear coat on your car. However, if used in high concentrations or applied in large quantities, it can start to break down the clear coat and cause harm to the finish. It’s important to use it carefully to avoid unintentional damage.
How do you remove clear coat over spray on a car?
To remove clear coat overspray from your car, start by using a clay bar on the affected area. If the overspray is stubborn, you can wet sand with fine sandpaper to achieve a better finish. For delicate surfaces like trim, a plastic razor blade can help. Regular cleaning keeps your car in good condition, and also protects it from swirl marks and spider cracks, making future maintenance easier.

Mian Hashir is a passionate automotive enthusiast and the lead author at Car Garagee, a website dedicated to providing in-depth car reviews, maintenance tips, and the latest news in the automotive world. With years of experience in the industry, Hashir combines his technical knowledge with a love for cars to deliver insightful and engaging content. Whether you’re a car owner or a curious reader, Mian Hashir’s articles help readers make informed decisions, from choosing the right vehicle to understanding how to keep it in top condition.